Introduction
Removing the space bar from a membrane keyboard can be a practical skill for anyone who wants to maintain a clean, functional keyboard. Whether it’s due to a sticky or unresponsive space bar or simply as part of regular cleaning, understanding the right way to remove the space bar can prevent damage to both the key and keyboard. Membrane keyboards are different from mechanical ones, and the delicate layers beneath the keys require special care. This guide will walk you through the process, helping you safely remove the space bar and troubleshoot common issues.

Tools Required for Removing the Space Bar
Before you begin, it’s essential to have the right tools to make the removal process smoother and prevent accidental damage. Here’s a list of recommended tools:
- Screwdriver: Some keyboards have screws that may need removal to access internal components. Ensure it matches the screw type of your keyboard.
- Flathead or Plastic Pry Tool: These tools are ideal for gently prying up the space bar without damaging surrounding keys or the keyboard’s surface.
Step-by-Step Guide to Removing the Space Bar from a Membrane Keyboard
A. Disconnecting the Keyboard from the Computer
Start by unplugging the keyboard from your computer to avoid any electrical issues. If you’re using a laptop with a built-in keyboard, consider shutting it down or disabling the keyboard through the system settings.
B. Removing the Keycap
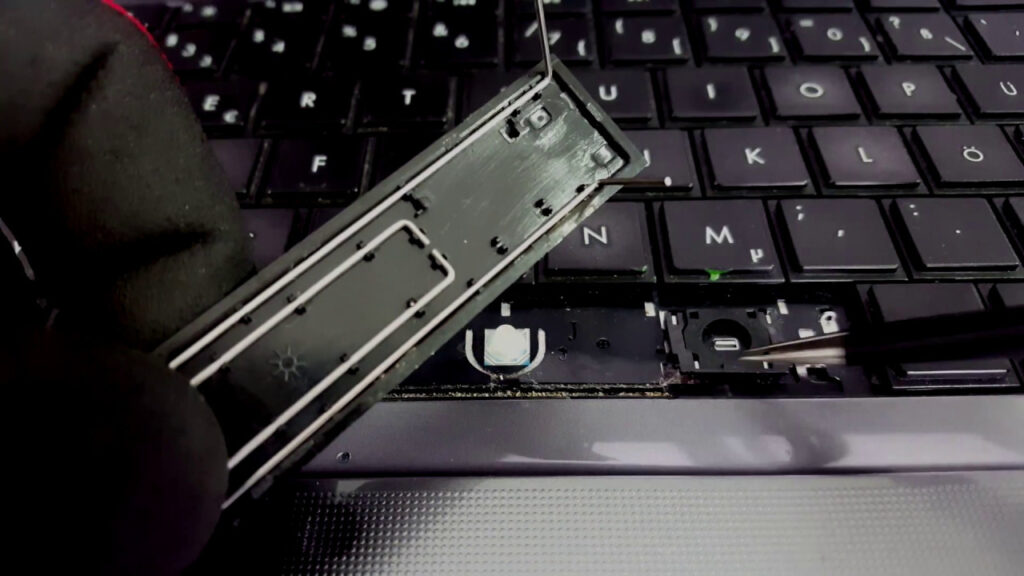
With your flathead or plastic pry tool, position it under one corner of the space bar and gently lift. Work your way around the edges of the keycap, applying even pressure to avoid damaging the membrane layer beneath. The space bar on a membrane keyboard is often secured by clips, so patience is key.
C. Detaching the Space Bar Mechanism
Once the keycap is off, you may find a stabilizer or other mechanisms beneath it. Carefully detach these parts if necessary, taking note of how they are positioned for easy reassembly. Some membrane keyboards may have small metal bars or clips, which stabilize the space bar, ensuring a uniform feel when pressed.
D. Cleaning the Key and Keyboard Surface
With the keycap and mechanism removed, take the opportunity to clean any accumulated dust or debris. You can use a soft brush or compressed air to clear out particles, followed by a damp microfiber cloth for a more thorough cleaning. Avoid using harsh chemicals, as these can damage the plastic materials of the membrane keyboard.
E. Reassembling the Space Bar
Once cleaned, begin reassembling the space bar. Start by reattaching any stabilizers or bars, ensuring they’re securely in place. Align the space bar over its original position and press down gently but firmly until you feel it click back into place. Reconnect the keyboard to your computer, or re-enable it if it’s part of a laptop, and test the space bar for responsiveness.
Troubleshooting Common Issues During Space Bar Removal
Removing the space bar from a membrane keyboard is usually straightforward, but problems can arise. Here are solutions to some common issues:
A. Space Bar Not Coming Off Smoothly
If the space bar is resistant to removal, check for hidden screws or latches. Applying too much force can damage the key, so try using a plastic pry tool to distribute pressure evenly.
B. Damaging the Space Bar Mechanism
If you accidentally damage the stabilizer or clips, it can affect the functionality of the space bar. Replacement parts may be available through the keyboard manufacturer, or you could use third-party replacement kits if the damage is severe.
C. Keyboard Not Working After Reassembling
If the keyboard doesn’t work after reassembly, double-check that all parts are securely attached and that the keyboard is plugged in or enabled. For external keyboards, try a different USB port or restart your computer to ensure it recognizes the keyboard.
Frequently Asked Questions (FAQs)
A. Can I Remove the Space Bar Without Damaging the Keyboard?
Yes, with careful handling and the right tools, you can safely remove the space bar without damaging your keyboard. Following the step-by-step guide above can help minimize risks.
B. How Often Should I Clean My Membrane Keyboard?
For optimal performance, clean your membrane keyboard every few months, or whenever you notice dust or dirt accumulation. Frequent users or those with pets may benefit from more frequent cleaning.
C. Can I Use the Same Method for Removing Other Keys?
The method for removing other keys is similar, but keep in mind that the space bar has additional stabilizers, making it slightly more complex. Smaller keys may come off easier, but they should still be handled carefully to avoid damaging the membrane.
Conclusion
Maintaining a clean and functional keyboard is crucial for effective typing and overall computer health. A sticky or unresponsive space bar can disrupt workflow, but with the steps provided, you can easily remove, clean, and reassemble the space bar on your membrane keyboard. Remember to handle all components gently and to keep a consistent cleaning routine to prevent future issues. By following these tips, you’ll ensure a smoother, longer-lasting keyboard experience.
